How to Remove an Object From a Photo
Erase an unwanted object, person, text or clutter from a photo with AI: what removes cleanly, how to describe it, and how to check edges and shadows.
· 9 min read
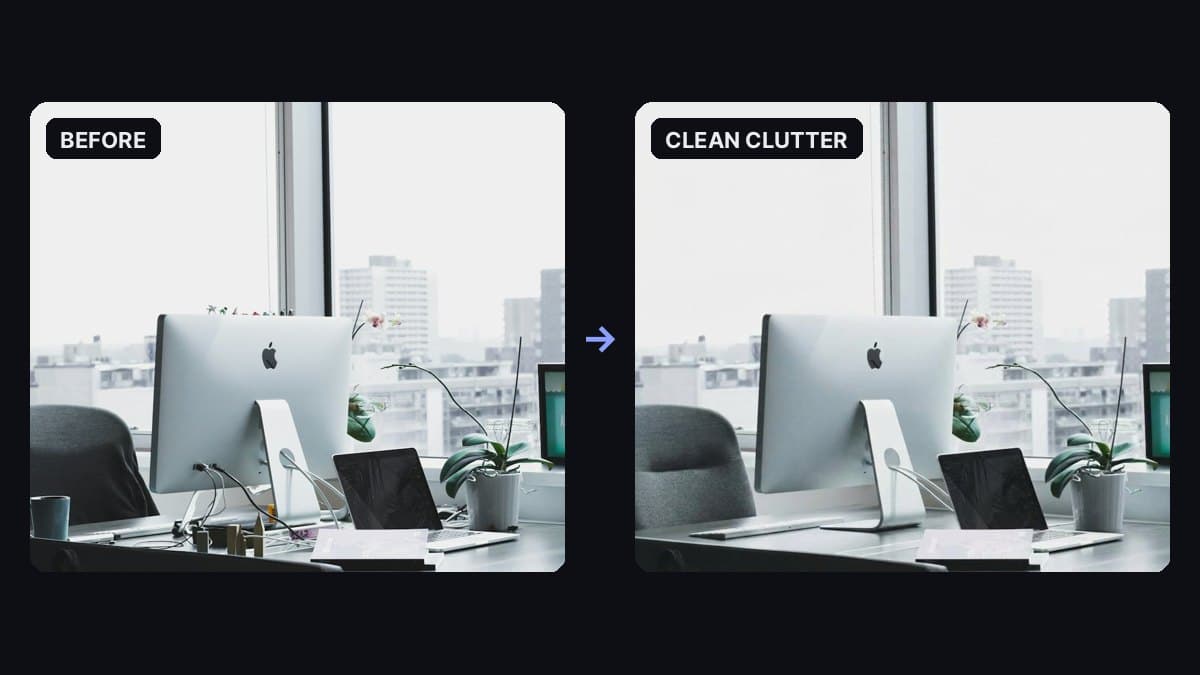
A cluttered desk (left) and the Clean clutter preset (right): real output from Object Remover.
To remove an object from a photo, start with a sharp copy of the image, tell an AI object remover exactly what to erase ("the blue mug on the left", "the man in the red jacket behind her"), and let it fill the gap with background that matches the light and texture around it. Then zoom in on the spot where the object was and check the edges, shadows and any repeating pattern before you use the result.
The image above shows a real result from our Object Remover with the Clean clutter preset. The blue mug, the tangle of black cables behind the monitor, the small wooden figurines on the desk and the row of tiny toy figures on the window ledge are gone. The monitor, laptop, orchid, framed poster and city view stayed put.
This guide covers which photos clean up well, how to describe what you want gone, removing people, text and logos, tidying clutter, and how to check the result so nobody can tell anything was there.
What removes cleanly (and what doesn't)
AI object removal doesn't uncover what was really behind the object. It paints a believable replacement based on the pixels around it. So the easier the surroundings are to continue, the cleaner the result.
Usually clean:
- Small or medium objects on simple backgrounds: sky, water, sand, grass, plain walls, floors, a desk or a table top.
- Wires and power lines against the sky.
- Litter, cups, bags and cables that sit apart from the main subject.
- Photobombers in the background who don't overlap the person you're keeping.
- Small stickers, captions or logos on a plain surface.
Harder:
- Objects that cover a big part of the frame. The bigger the hole, the more the AI has to invent.
- Anything in front of the main subject, like a hand over a face or a bag across someone's body. The AI has to rebuild part of the person.
- Busy, structured backgrounds behind the object: text, brick or tile grids, fences and railings in perspective. These show mistakes first.
- Faces and readable signs right next to the object.
If your photo falls in the "harder" list, it can still work. Expect to run it more than once and check it closely.
Step 1: Pick the best version of the photo
- Use the sharpest, largest copy you have, not a screenshot or a compressed copy from a chat app.
- Crop out what you don't need first. If an object is right at the edge, cropping it away is cleaner than erasing it.
- Keep the original. Work on a copy so you can always go back.
The tool accepts JPG, PNG, WEBP, GIF and BMP (and HEIC when your browser can open it) up to 10 MB, and you can paste an image straight from your clipboard.
Step 2: Choose a preset
Open Object Remover, drop in your photo and pick the preset that matches the job:
- Erase object: removes the object you name and fills the gap with matching background, light and texture. Start here for a single unwanted thing. It's told to keep every other subject, face and logo exactly as it is.
- Remove text / logo: for watermarks, captions, stickers and logos. Use this one for text and logos, since Erase object is told to keep logos as they are.
- Remove person: for a photobomber or someone in the background. It's told to keep the main subject's face, pose and clothing unchanged.
- Clean clutter: for lots of small distractions at once, such as wires, trash, reflections and stray items. This is the preset used in the example above.
Step 3: Say what to remove in Notes
Object Remover doesn't use a brush or a mask. You mark the object with words, in the What to remove field that opens under the presets. Being specific is the single biggest thing you can do for a clean result.
Describe the object by what it is, where it is and what it looks like:
- "The blue mug on the left side of the desk"
- "The man in the red jacket behind the woman, on the right"
- "The power line across the top of the sky"
- "The logo in the bottom right corner"
- "The trash can next to the bench"
Name one object, or a short list of small ones. If you leave Notes empty, the presets pick a target themselves (Erase object goes for the most obvious unwanted object, Remove person for the most distracting background person). That works on simple photos but is a guess on busy ones.
Then click Remove object. When it's done, click Download to save the image.
Removing people
Pick Remove person and say who should go. Position and clothing are the clearest way to point at one person: "the man in the gray hoodie on the far left", "the two people walking in the background".
- People in the background come out cleanest, especially when there's open ground, sky or a plain wall behind them.
- Someone touching or overlapping your subject (an arm around a shoulder, a person half behind them) is the hard case. Check hands, hair and clothing edges closely.
- Crowds work better one or two people at a time than all at once.
Then look at the main person in the photo. Their face, hair and clothes should be unchanged.
Removing text, logos and watermarks
Remove text / logo handles captions, date stamps, stickers and logos. Name the target in Notes ("the date stamp in the bottom right", "the sticker on the laptop lid").
Use it only on photos you own or have the rights to edit, such as your own photos with a date stamp or your own product shot with an old logo. It isn't a way to strip watermarks from stock photos or other people's work. A watermark means the image is licensed, so buy the license or use a different image.
Cleaning up clutter
For a room, a desk, a street or a product shot with lots of small distractions, pick Clean clutter and list what bothers you: "the cables, the mug and the small figurines". In the example, it handled the mug, the cables and two groups of small figures in one pass.
It's fine to do this in rounds. In our example, the black cables were removed but the white cable running through the monitor stand to the laptop stayed. To take that one out too, you'd open Image History below the tool, click Continue editing on the result to use it as the next source photo, and run it again with "the white cable through the monitor stand" in Notes.
Every result is saved to Image History, so you can also reopen an earlier version if a later pass went too far.
Object Remover
Erase unwanted objects, people, or text from photos in one click.
Step 4: Check the result
Zoom in to full size and compare the result with your original:
- The edges of the removed object. Look for a halo, a blur or a faint outline where it used to be.
- Shadows and reflections. A missing mug with its shadow still on the desk gives the edit away. If a shadow or reflection stays behind, run it again and name it: "the mug and its shadow".
- Repeated patterns. Tiles, bricks, fences, window frames and text should line up through the filled area, with no copied patch or bent line.
- Everything else in the photo. The model regenerates the whole image, so other details can shift a little. In our example, the office chair came back a lighter gray with a different fabric texture, and the keyboard that was half hidden behind the mug was redrawn as a full keyboard. That's fine for a desk shot, but check anything that matters to you, such as faces, logos and text you wanted to keep.
- Nothing new. The presets tell the model not to invent people, props or text. If something appears that wasn't there, run it again.
If a result is close but not right, try once more with a more specific note before switching presets.
When to use Generative Expand or Photo Enhancer too
- Need more room around the subject? Removing an object near the edge can leave the composition feeling tight. After the cleanup, run the photo through Generative Expand to widen it for a banner, a story or a square post. Do the removal first, so the expansion doesn't copy the clutter into the new area. Our guide on how to make a photo wider without stretching covers that step.
- Need it sharper or bigger? Use Photo Enhancer last. Upscale & sharpen adds clarity for print, and Fix blur helps a soft photo. Sharpening before removal would also sharpen the thing you're about to erase.
A good order is: remove, then expand, then enhance.
A word on honesty
Cleaning up a messy desk or a stranger in your vacation photo is ordinary editing. Removing permanent features is different. On a real estate listing or a product page, don't erase cracks, power lines, stains, scratches or anything else a buyer would see in person. Use object removal for things that were temporarily in the shot, like clutter, cars, bins and people.
What it costs
Each removal uses about 155 credits, because image models cost more to run than text. New accounts get 100 free credits, which isn't quite enough for a removal, so you'll need a credit pack for your first one. The $5 Starter pack has 5,000 credits, enough for about 32 cleanups. If the model doesn't return an image, the run isn't charged. The same credits work across all the tools on Many AI Tools. See pricing for all packs.
Quick answers
How do I remove a person from a photo? Upload it to Object Remover, pick Remove person, and describe who to remove by position and clothing in Notes, for example "the man in the red jacket on the left". Then check the edges around the people you kept.
Do I need to paint over or select the object? No. You describe it in words in the Notes field. The more specific the description (what it is, where it is, its color), the better the result.
Can I remove several objects at once? Yes. List them in Notes, or use Clean clutter for lots of small items. For a few large objects, removing them one at a time with Continue editing usually gives cleaner fills.
Will it change the rest of my photo? The prompts tell the model to keep everything else exact, but it regenerates the whole image, so small details can shift. Compare the result with your original before you use it.
Can it remove a watermark? It can remove text and logos from photos you own or have the rights to edit. It isn't meant for removing watermarks from images you don't have the rights to use.
Object Remover or Background Remover? Object Remover deletes things inside the frame and fills in the background behind them. Background Remover cuts the whole subject out of its background.
How much does it cost? About 155 credits per removal. Credit packs start at $5 for 5,000 credits, about 32 removals.
Restoring an old family print instead? Our guide on how to remove scratches from an old photo covers damage, stains and adding color.